• Skip to primary navigation
  • Skip to main content
  • Skip to primary sidebar
  • Skip to footer
  • Motherhood
  • Faith
  • Homeschooling
  • Crafts
  • Recipes
  • Family Fun
  • House & Home
  • Disclosure

MississippiMom.com

Blogging about Family and Faith in the Hospitality State

Privacy & Cookies: This site uses cookies. By continuing to use this website, you agree to their use.
To find out more, including how to control cookies, see here: Cookie Policy
You are here: Home / Crafts / Make-It-Yourself Monday: Beautiful Bangles

January 9, 2012 By MississippiMom

Make-It-Yourself Monday: Beautiful Bangles

This post contains affiliate links to products mentioned. For more information, read my disclosure policy.

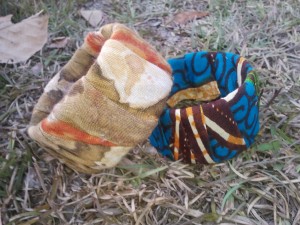
This is a simple craft that my little girl loved helping to make…and wear!  It uses fabric scraps and recycled water bottles so it’s also a way to make something new out of something old.  Here’s what you need:

  • empty water bottles (The 1/2 liter bottle was perfect for my daughter’s wrist.  For a larger wrist, you can use a liter bottle or expand a smaller one as described below.)
  • fabric scraps
  • hot glue
  • duck tape (if you need to expand the size of a bottle).

The process is pretty simple.  First, you cut the water bottle into rings the desired width of your bracelet.  Then you take your fabric and glue one end to the inside of the plastic ring.  To have smooth (not fraying) edges fold each side under as you wrap the fabric around the ring, adding glue here and there to hold the fabric in place.  When you finish wrapping the ring, cut the fabric and fold the end under and glue to the inside of the bracelet.  Ta-da!  You’re done!

If you need to expand a smaller bottle to fit a larger wrist, just take one of the fabric ring and cut it on one side, leaving an opening, then determine how much larger it needs to be and use duck tape to  connect the two sides with the appropriate space between them.  (This might not make much sense, but it will be a ring again with a patch of duck tape on one side.)  Be sure to wrap the duck tape enough times to be sturdy enough.

Enjoy!

P.S.  I saw this idea in several places months ago so I don’t know exactly who to credit with the idea…it’s not originally mine, though.
  • Email
  • Facebook
  • Twitter
  • Pinterest
  • Tumblr
  • LinkedIn
  • Print

Like this:

Like Loading...

Related

Pin
Share
Tweet
Share
0 Shares

Filed Under: Crafts, Make-It-Yourself Monday Tagged With: Crafts

Reader Interactions

Comments

  1. Elise says

    January 18, 2012 at 1:21 pm

    Those are really cool! Especially considering that they’ll double as entertainment for my seven month old. 🙂

Primary Sidebar

  • Bloglovin
  • Email
  • Facebook
  • Pinterest
  • Twitter
  • YouTube

Don’t Miss….


  • the-wife-i-dont-want-to-be.png
  • what-if-you-make-a-mess-of-motherhood.png
  • how-to-bake-blueberry-muffins-better-than-a-bakery.png
  • an-encouraging-word-from-the-worst-mom-ever.png

  • how-to-plan-a-dinosaur-dig-birthday-party.png
  • trying-confessions-of-an-honest-mom.png
  • how-to-bake-a-kentucky-legend-ham.png
  • how-to-have-hope-when-you-feel-abandoned.png

Read More from the Archives

  • Motherhood
  • Faith
  • Homeschooling
  • Crafts
  • Recipes
  • Family Fun
  • House & Home
  • Disclosure

Disclosure

Click here to read my disclosure policy. MississippiMom.com is a participant in the Amazon Services LLC Associates Program, an affiliate advertising program designed to provide a means for sites to earn advertising fees by advertising and linking to Amazon.com.

Read More from the Archives

  • Motherhood
  • Faith
  • Homeschooling
  • Crafts
  • Recipes
  • Family Fun
  • House & Home
  • Disclosure

Footer

Copyright © 2025 · Brunch Pro Theme On Genesis Framework · WordPress · Log in

%d