This post may contain affiliate links to products or services mentioned, and we may receive an affiliate commission for any purchases made by you on the affiliate website using such links.
March is National Craft Month, and to celebrate, each Monday this month, MississippiMom.com will feature a different craft for Make-It-Yourself Monday. We’re starting today with a crayon batik that’s so simple to make that young children can do it with a little supervision.
I fell in love with batiks when I lived in Kenya and am always amazed when I see one with an intricate design, wondering how on earth the artist did it. If you’re not familiar with batiks, they are made by dripping melted wax onto fabric in various designs then dyeing the fabric in different colors. By removing the wax and/or adding it to different areas, you control where the colors go, how they mix, etc. (Please forgive my probably over-simplified, non-art major explanation of this…this is just how I understand the process!) Anyway, a class I help teach is focusing on making African arts and crafts for a few weeks, and I wanted to introduce them to batiks without the mess (and danger) of hot wax so crayon batiks it is!
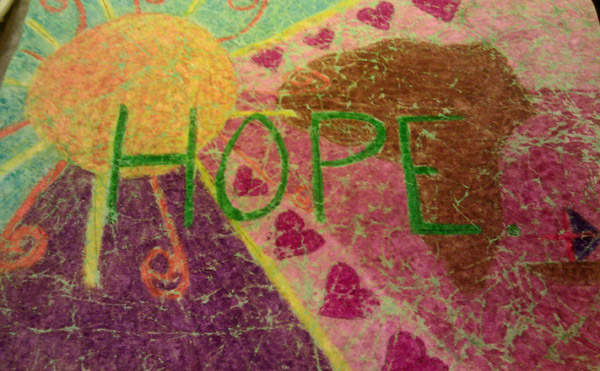
This project is really easy and creates the look of a batik while helping kids understand the idea of resist dyeing. (See, I learned a little something in all the internet searches leading up to this craft!) The photo above is the batik that my daughter made this weekend as we were practicing (and I was preparing to teach) the project. I helped her sketch the design in the beginning and cover it in paint and iron it at the end….otherwise, she did the entire project herself! She loved it.
Here’s what you’ll need:
white or manila paper
crayons
Black (or other dark color) tempera paint
Paintbrushes or Sponges
Sponges or paper towels
Step One:
Sketch your design. You could also use a sheet from a coloring book or print something off of your computer. I tried to keep the lines a little faint so they would be less noticeable at the end, but it probably doesn’t matter much.
Step Two (or The One That Takes a While):
Color your batik. Heavily. For this to work, you really need to put a thick layer of crayon on the paper. Also, remember that any of the paper that’s showing through will be painted over at the end. We aimed to cover every bit of paper in color, but you might choose to leave some areas blank.
Step Three (or The One That Might Hurt Your Heart):
Take your beautiful drawing and crumple it up…good. Yes, you heard me. This creates the cracks that will give the finished product the look of a batik. The more you crumple, the more cracks…so do it to your taste.
Step Four (or The Messy One):
Take the tempera paint (I used green in the photos below) and paint over the picture, wiping the excess away with a sponge or paper towel. You might have to thin the paint a bit, but I found that unnecessary with the paint I had on hand. Also, you really do need a darker color. The purple tempera paint we used on my daughter’s didn’t show up much at all, and I had to use a few coats of the green to get the color I was going for. But that’s okay…just keep layering until you like it!
Step Five (or The One Mama Has to Do):
Place the batik between two sheets of paper and iron it. You’ll see the design showing up on the piece of paper on top of the picture and that’s how you’ll know you’ve ironed it enough.
Finished Product:
The pictures don’t really do justice to how well these turned out…I think the flash made the colors in the cracks much less noticeable. They really do look a lot like batiks!
So, if you’re looking for an easy art project to do with your kids, give this a try. It’s a great way to spend a little time together. Just don’t be too upset when you’re daughter finishes her masterpiece and says, “Can I give it to my teacher?” Just be glad she loves her teacher. And, remember, she can always make another one for you.
What’s your favorite easy craft project for kids?


